Assessments can be used to identify a person's social needs so your navigators can find the best way to help them. You can customize an assessment to use your own set of questions or use a standard one, like the Health-Related Social Needs (HRSN) Assessment. This can also be a beneficial way to gather specific data points.
Additional assessment-related analytics are available. These analytic dashboards provide insight into eligibility, demographic, and social needs information.
Who Completes the Assessment:
-
Your navigators can fill it out on behalf of the person they are helping.
-
A seeker (the person needing help) can complete it themselves.
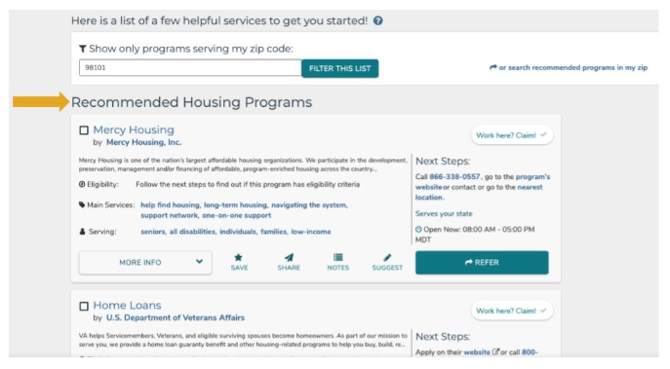
Once submitted, the platform will provide a list of programs that match the Seeker's top social needs.
If you are interested in setting up an assessment for your site, reach out to your customer success manager and review the process for configuring one below:
How Your Assessment is Accessed
When configured, assessments are visible on the homepage of your site. If there is one Assessment, the button on the homepage will reflect the name of the Assessment. If there are multiple Assessments available, the button will say Start a Form.
Assessments can also be started from inside of the seeker's profile in the forms section. This ties the data collected into their shared care record.
Creating a Custom Assessment
If you want to gather specific data, you can create a custom assessment that navigators can use when assisting seekers in finding resources. You will follow these steps with your customer success manager.
Step 1: Determining Your Assessment Questions
You will start by asking yourself, what demographic information do you want to collect? We have a few standard fields that are in a seeker profile:
-
First Name
-
Last Name
-
Phone Number
-
Email
You can also collect additional information. such as ID numbers, date of birth, and preferred languages. This can all be customized to meet your organization's needs.
⚠️ We do not support recording Social Security numbers.
After you have your demographic info collected, what additional questions would you like to ask? Assessments are typically used to identify social care needs. What are the social care questions you want to ask to determine someone's need?
Step 2: Configuring Your Assessment Layout
When you are creating a custom assessment, there are a few key decisions you will need to make regarding the layout.
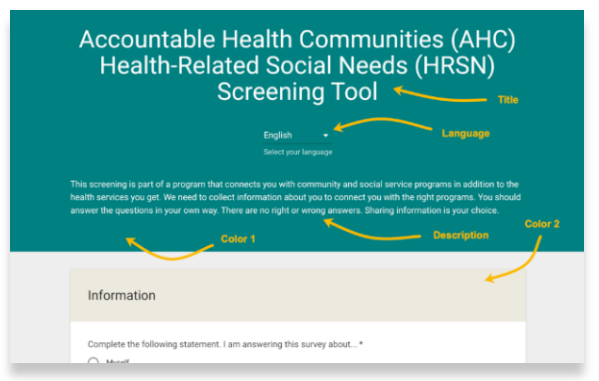
Assessment Title
The assessment title appears at the very top of the form. While it can be the same as the form's name, having a separate title allows you to use a longer, more descriptive name if you need to. You can customize this to specifically describe what you want this assessment to do.
Assessment Description
You can decide the language you want to use in the form's intro. The intro text is the descriptive message at the top of your form. You can write this text in any language you choose.
For the best user experience, it's best to keep the intro short—one or two paragraphs at most. Since it supports HTML, you can also use formatting like bold, italics, underlining, and hyperlinks.
Additional Supported Languages
Your assessments automatically support Google Translate.
If you need more precise control over the language, you can configure your assessment to include a dropdown menu for native translations. If you choose this option, however, your organization must provide all of the translated text for every question and answer.
Color Scheme
Forms on the platform support two custom colors. To keep it simple, it's best to choose from Google Color Options because the system will automatically handle text contrast and button colors for you. This means you don't have to worry about whether to use black or white text.
Here's how those two colors are used:
-
Primary Color: Used for the form's title and introduction background.
-
Secondary Color: Used for the headings of each section and the secondary button.
Using Other Colors
While it's possible to use colors that aren't from Google, it's a bit more complex. You must provide a light, medium, and dark version for each color you want to use. All three versions must be tested to ensure they meet WCAG color-contrast accessibility standards. There are many online tools available to help you test this.
Section Headers
Headers are available to define different sections of questions. You will know how many you need based on decisions you have made when you were determining what information you want to gather.
Headers are not HTML-enabled and cannot have formatting, hyperlinks, etc.
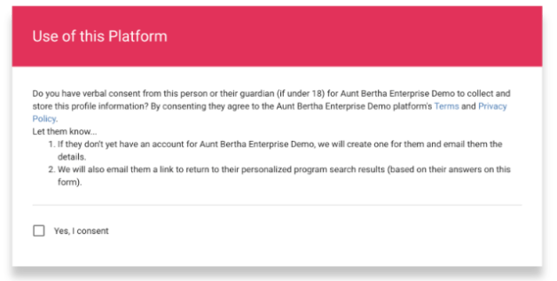
Step 3: Configuring Assessment Consent
Once an assessment is completed by a seeker or navigator, they will have the option to review the Assessment responses, confirm consent, and submit the Assessment.
By default, all Assessments will have the following required check box to confirm consent and to allow submission of the form. You have the option to add additional text in the consent section, above the findhelp default consent language.
As a configurable option, an Assessment can require the creator to perform a handwritten or typed signature on the second Assessment review screen prior to submission. If configured, the completion of the handwritten/typed attestation will be replacement for the standard Assessment consent checkbox above.
Step 4: Determining your Assessment Search Result Configurations
Once the assessment is completed, there are additional configuration options you will choose. This includes an email notification and post assessment landing page.
1. Email Notifications
After an assessment is submitted, the Seeker (the person being helped) and the person who completed the assessment will both receive an email. This email contains a link to program recommendations that match the Seeker's needs.
These notifications can be turned on or off.
2. Post Assessment Landing Page
Once your navigator completes an assessment, they'll be taken to one of three places: a page with program recommendations, a summary of those recommendations, or a simple thank you page. The page they see depends on how the assessment is configured.
Highlighted Search
When an Assessment is submitted, Highlighted Search will automatically generate search results based on the Assessment responses. In the main menu bar, you will see the categories that match the identified needs, highlighted in the menu bar.

Program Recommended Summary (PRS)
A Program Recommendation Summary (PRS) is a short, printable, curated list of programs that are generated for people after they submit an assessment, The list is based on the social needs identified.
Within the view of the PRS, you will see a heading for each area of need identified on the Assessment. The heading displayed corresponds with the name of a favorite folder you create.
💡 If you have a specific list of programs to recommend, we suggest using the PRS search page.
Thank You Page
When filling out a form, you have the option to send people directly to a "Thank you" page. If you choose this, the information you entered will be saved and a profile will be created, but they will not see a page with search results for programs.